Step-by-Step Student System Tutorial

Designed exclusively for Students using the NetMaster Gamified Networking Environment. Watch the complete walkthrough and lab demo videos below, or follow every illustrated step in sequence — from registering your profile and signing in to executing Cisco IOS CLI quests, submitting Packet Tracer labs, answering the ISO/IEC 25010 evaluation survey, and receiving your official QR-verified certificate.

Official System Video Walkthroughs

Complete Student Dashboard & Lab Activities Walkthrough

🎬

Complete Student Dashboard & Lab Activities Walkthrough

System Tours

Watch the complete walkthrough video of the student dashboard or hands-on lab activities step by step.

Now Playing: Complete Student Dashboard Walkthrough TourSTUDENT DASHBOARD VIEW
Google Drive Video Player • Complete Student Dashboard Tour
Complete Student Handbook • Actual Dashboard Screenshots

All 17 Step-by-Step Instructions (No Skipped Steps)

STEP 01Getting Started⏱ 2 mins

Create Your Student Account (Registration)

Every student begins by creating an official NetMaster Student account with accurate academic and identity details.

Before You Start (Prerequisites)
  • •Valid institutional or active email address
  • •Your official Student ID Number (e.g., 2417-0001M)
Exact Step-by-Step Instructions
1.

Open the Registration Page

From the landing page navbar, click 'Register' to open /register.

2.

Enter Personal & Academic Information

Fill in First Name, Middle Name (optional), Last Name, Birthdate (Age auto-calculates), Gender, Complete Address, Student ID No., Email, Course, Year Level, Academic Semester, and Section.

⚠️
Avoid This Common MistakeMissing any of the 4 password complexity rules, leaving the Data Privacy checkbox unchecked, or selecting Section C for 3rd Year (only Sections A and B are available for 3rd Year).
netmaster.edu/register
Student View
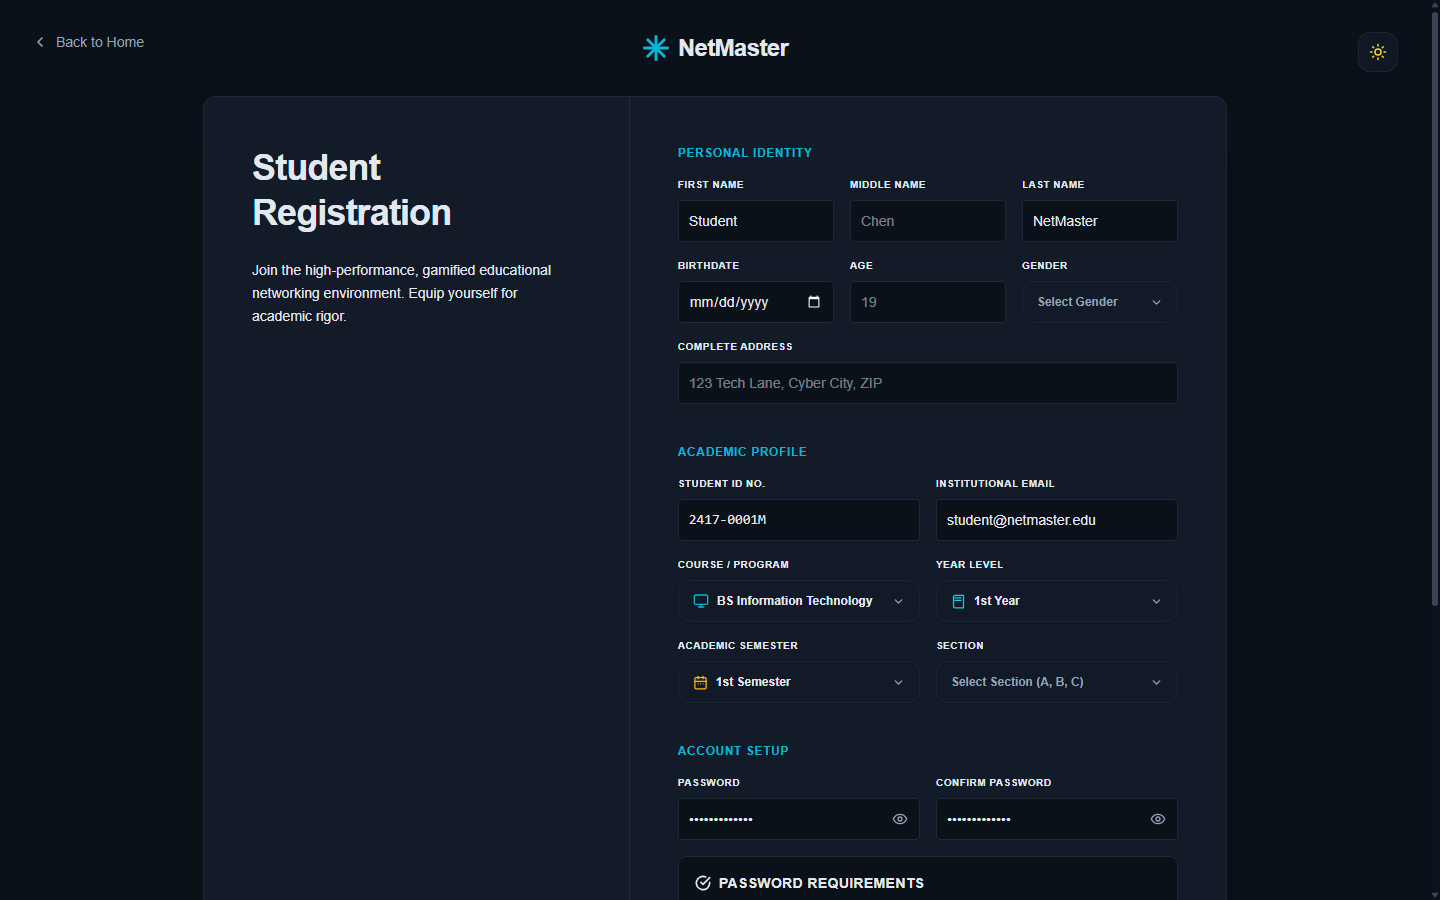
NetMaster Student Registration Form (/register)
Click to Enlarge Full Screenshot

📷 NetMaster Student Registration Form (/register)
STEP 02Getting Started⏱ 1 min

Sign In with Your Email & Password

Once your account is admitted by your professor or administrator (or automatically if Auto-Admit is enabled), log in directly using the email and password you registered.

Before You Start (Prerequisites)
  • •Completed Step 1 Student Registration
  • •Admitted Student Account Status
Exact Step-by-Step Instructions
1.

Select 'Student' Access Mode

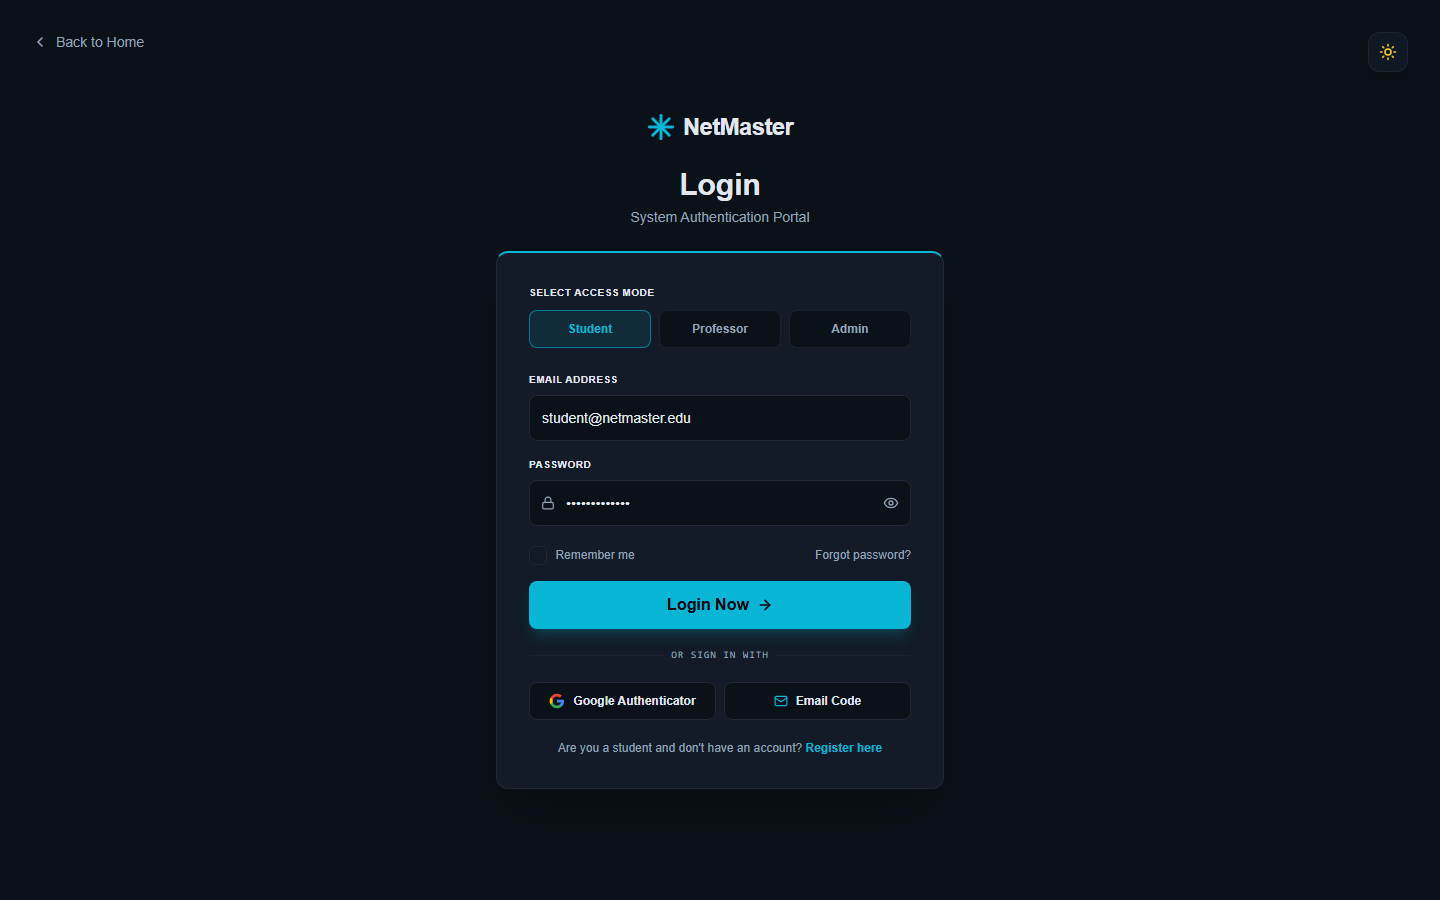
Open /login and click 'Student' under SELECT ACCESS MODE at the top of the card.

2.

Put Your Registered Email Address

Click the 'EMAIL ADDRESS' input field and type your exact registered email address (for example, [email protected]).

⚠️
Avoid This Common MistakeTrying to sign in with Professor or Admin selected in Access Mode, or entering a mistyped email before admission is approved.
netmaster.edu/login
Student View
Student Portal Login displaying Email & Password authentication (/login)
Click to Enlarge Full Screenshot

📷 Student Portal Login displaying Email & Password authentication (/login)

STEP 03Dashboard & Daily Habit⏱ 2 mins

Navigate Your Student Command Center (Dashboard)

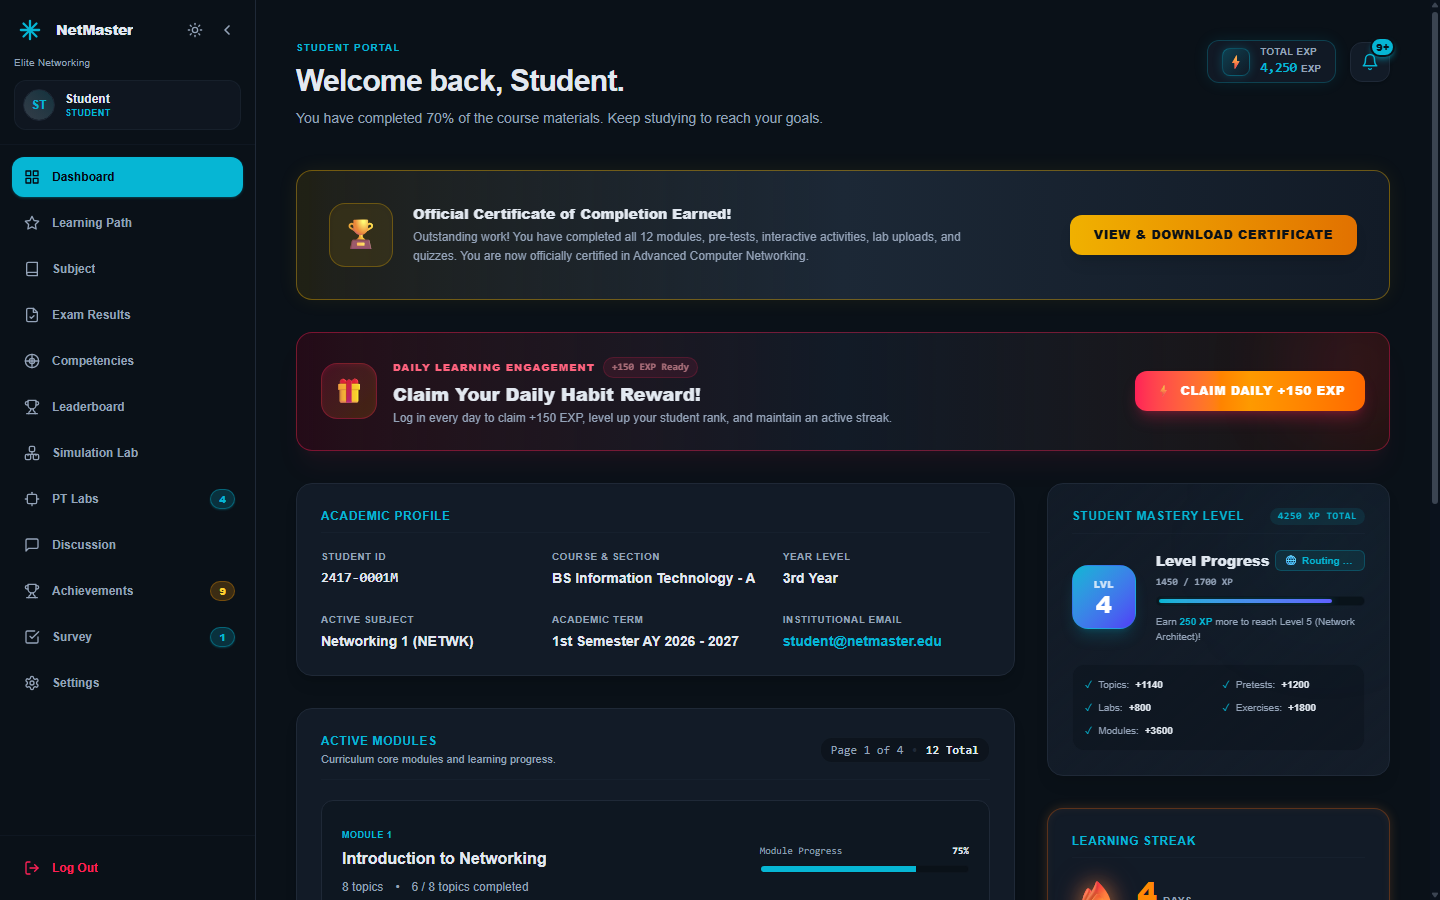
Your Student Dashboard (/student) is your mission control hub displaying real-time EXP, engineering level rank, academic profile, active modules, and sidebar navigation.

Before You Start (Prerequisites)
  • •Signed in as Student on /student
Exact Step-by-Step Instructions
1.

Confirm Your Display Name & Student Identity

Check the top-left profile card ('Student' / 'STUDENT') and main greeting ('Welcome back, Student.') plus your Academic Profile details.

2.

Track Total EXP & Level Progress

Inspect the Total EXP pill in the header and the Student Mastery Level card on the right to see your remaining XP to level up.

⚠️
Avoid This Common MistakeStaying only on the Dashboard landing card without checking the numbered module badges and sidebar sections.
netmaster.edu/student
Student View
Actual Student Dashboard displaying 'Student', Level, EXP & Sidebar (/student)
Click to Enlarge Full Screenshot

📷 Actual Student Dashboard displaying 'Student', Level, EXP & Sidebar (/student)

STEP 04Dashboard & Daily Habit⏱ 30 secs/day

Claim Daily Attendance Rewards & Maintain Your Streak

Earn bonus daily attendance EXP every calendar day and maintain an active consecutive study streak straight from the top of your dashboard.

Before You Start (Prerequisites)
  • •Active Student Session on /student
Exact Step-by-Step Instructions
1.

Locate the Daily Learning Engagement Card

Look below the header on /student for the 'DAILY LEARNING ENGAGEMENT (+150 EXP Ready)' banner showing 'Claim Your Daily Habit Reward!'.

2.

Click 'CLAIM DAILY +150 EXP'

Click the bright orange-coral 'CLAIM DAILY +150 EXP' button on the right side of the banner (exact EXP reflects professor/admin configuration).

⚠️
Avoid This Common MistakeClosing the dashboard immediately after login before clicking the 'CLAIM DAILY +150 EXP' button.
netmaster.edu/student
Student View
Daily Learning Engagement '+150 EXP Ready' Banner & Claim Button (/student)
Click to Enlarge Full Screenshot

📷 Daily Learning Engagement '+150 EXP Ready' Banner & Claim Button (/student)

STEP 05Curriculum & Exams⏱ 10-15 mins per quest

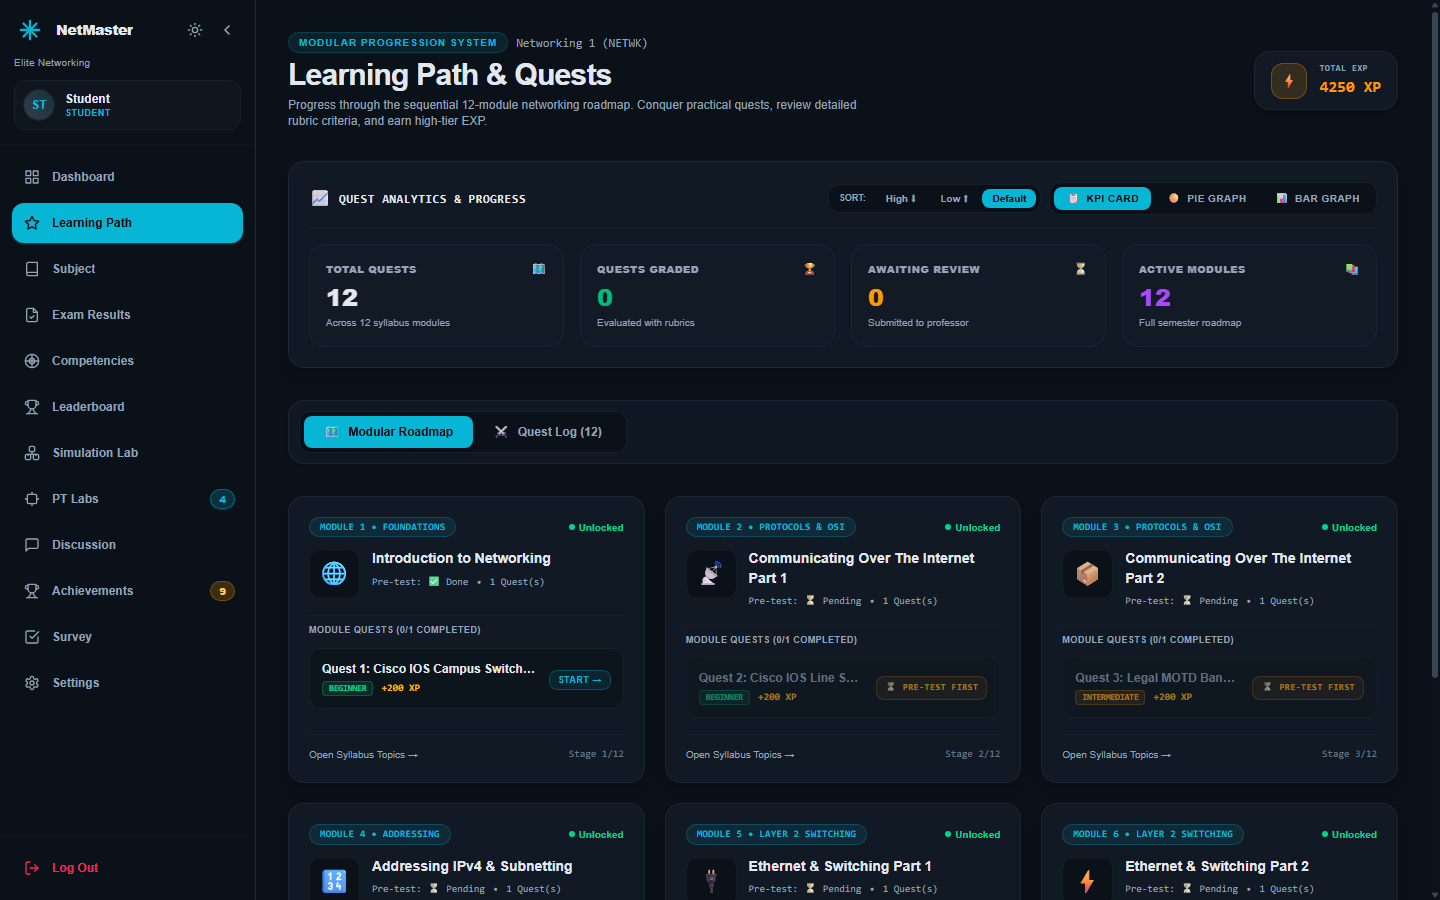
Explore Learning Path & Cisco CLI Quests

The Learning Path visualizes your sequential progress across all 12 networking modules alongside practical rubric-graded quests.

Before You Start (Prerequisites)
  • •Logged in to Student Portal
Exact Step-by-Step Instructions
1.

Open 'Learning Path' from the Sidebar

Click 'Learning Path' (/student/quests) to inspect total quests, graded quests, awaiting reviews, and module stages.

2.

Switch Analytics View Modes

Click 'KPI CARD', 'PIE GRAPH', or 'BAR GRAPH' on the Quest Analytics toolbar, and use Sort (High / Low / Default) to spot pending modules.

⚠️
Avoid This Common MistakeSubmitting CLI quests without verification output such as `show running-config` or `ping` connectivity checks.
netmaster.edu/student/quests
Student View
Student Learning Path & Practical Quests Progression (/student/quests)
Click to Enlarge Full Screenshot

📷 Student Learning Path & Practical Quests Progression (/student/quests)

STEP 06Curriculum & Exams⏱ 5 mins per module

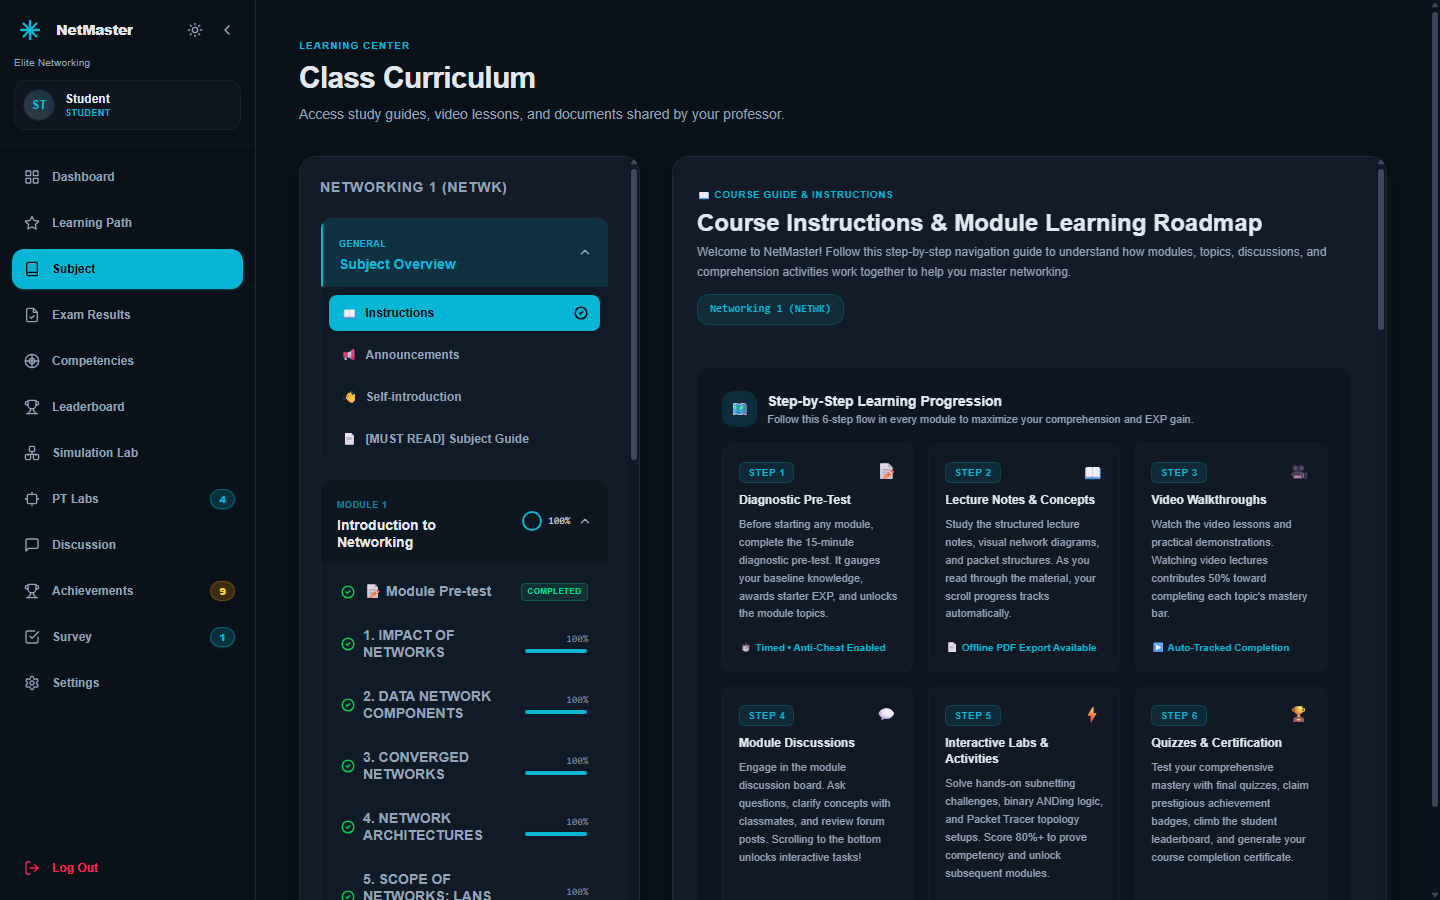
Open Subject Modules & Pass Diagnostic Pre-Tests

Every Networking 1 module inside Subject (/student/curriculum) follows a structured 6-step path starting with the Subject Overview and Diagnostic Pre-Test.

Before You Start (Prerequisites)
  • •Access to /student/curriculum
Exact Step-by-Step Instructions
1.

Click 'Subject' in the Left Sidebar

Navigate to /student/curriculum to view General Orientation ('Subject Overview') and Modules 1 through 12.

2.

Read Instructions & Subject Guide First

Review 'Instructions', 'Announcements', 'Self-introduction', and '[MUST READ] Subject Guide' under Subject Overview to understand the 6-step module flow.

⚠️
Avoid This Common MistakeTrying to open later lecture topics before submitting that module's mandatory Diagnostic Pre-test.
netmaster.edu/student/curriculum
Student View
Class Curriculum Subject Overview & Diagnostic Pre-Test Gate (/student/curriculum)
Click to Enlarge Full Screenshot

📷 Class Curriculum Subject Overview & Diagnostic Pre-Test Gate (/student/curriculum)

STEP 07Curriculum & Exams⏱ 15-25 mins per module

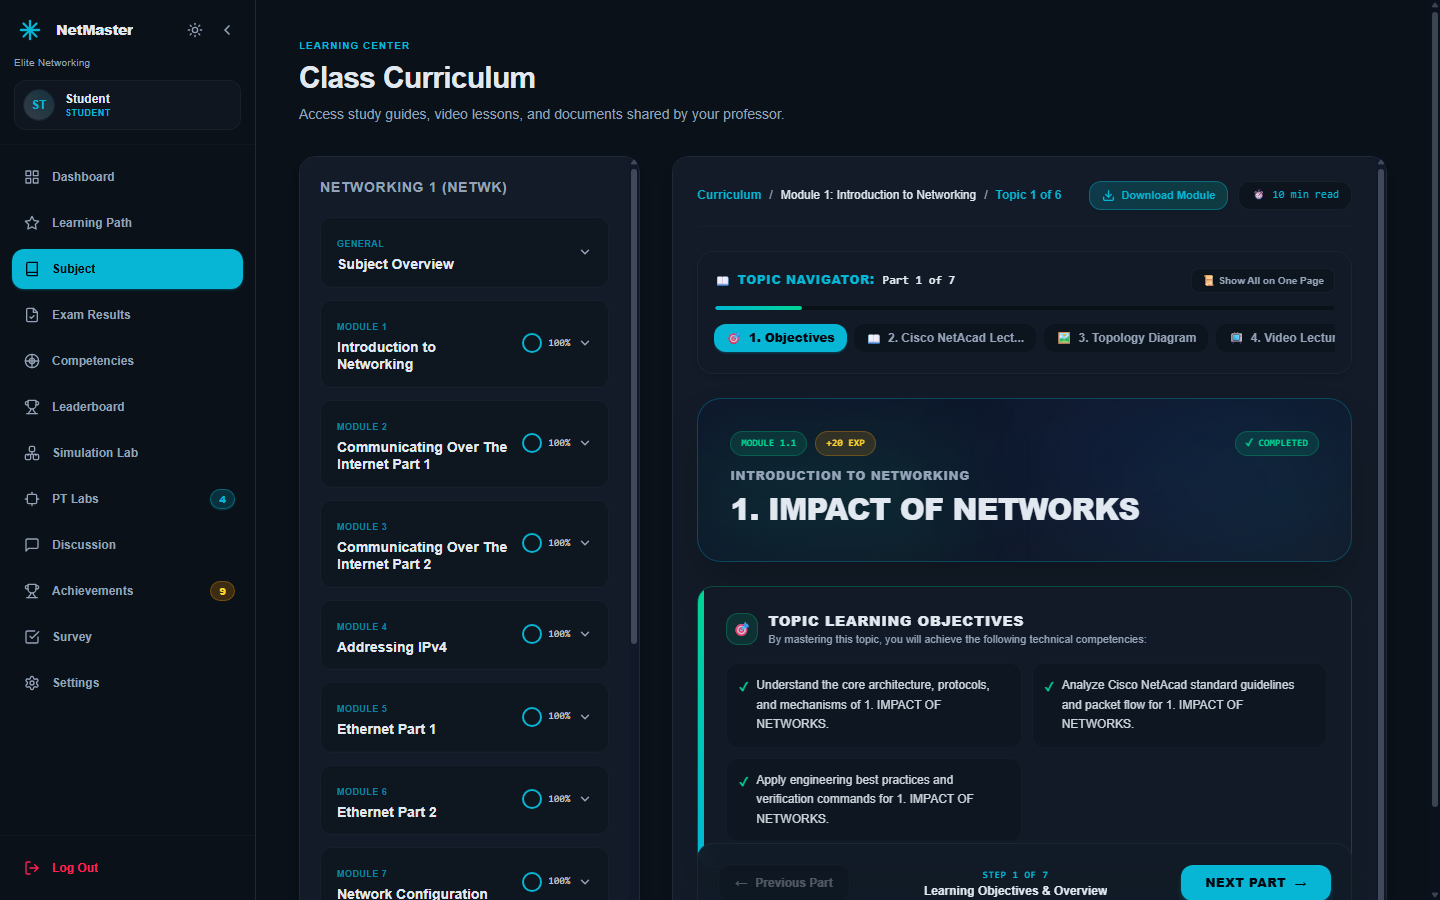
Study Module Lessons & Complete Interactive Activities

Inside each unlocked module, read all numbered topic lessons across the Topic Navigator tabs, earn reading EXP, and complete the Module Interactive Activity.

Before You Start (Prerequisites)
  • •Submitted the module's Diagnostic Pre-Test
Exact Step-by-Step Instructions
1.

Select Each Sequential Lesson Topic

In the module panel, click through numbered topics (such as Topic 1 through Topic 6) to open the formatted NetAcad lecture view.

2.

Advance Through Topic Navigator Parts (1 to 7)

Use the Topic Navigator tabs ('1. Objectives', '2. Cisco NetAcad Lecture', '3. Topology Diagram', '4. Video Lecture', etc.) and click 'NEXT PART ->' at the bottom right to record 100% completion and reading EXP.

⚠️
Avoid This Common MistakeSkipping the 'Interactive Activity' checkpoint inside a module leaves your Certificate Roadmap under 100%.
netmaster.edu/student/curriculum
Student View
Module Lecture Workspace with Topic Navigator Tabs 1-7 & Progress Tracking
Click to Enlarge Full Screenshot

📷 Module Lecture Workspace with Topic Navigator Tabs 1-7 & Progress Tracking

STEP 08Curriculum & Exams⏱ 10 mins / exam, 45 mins Final

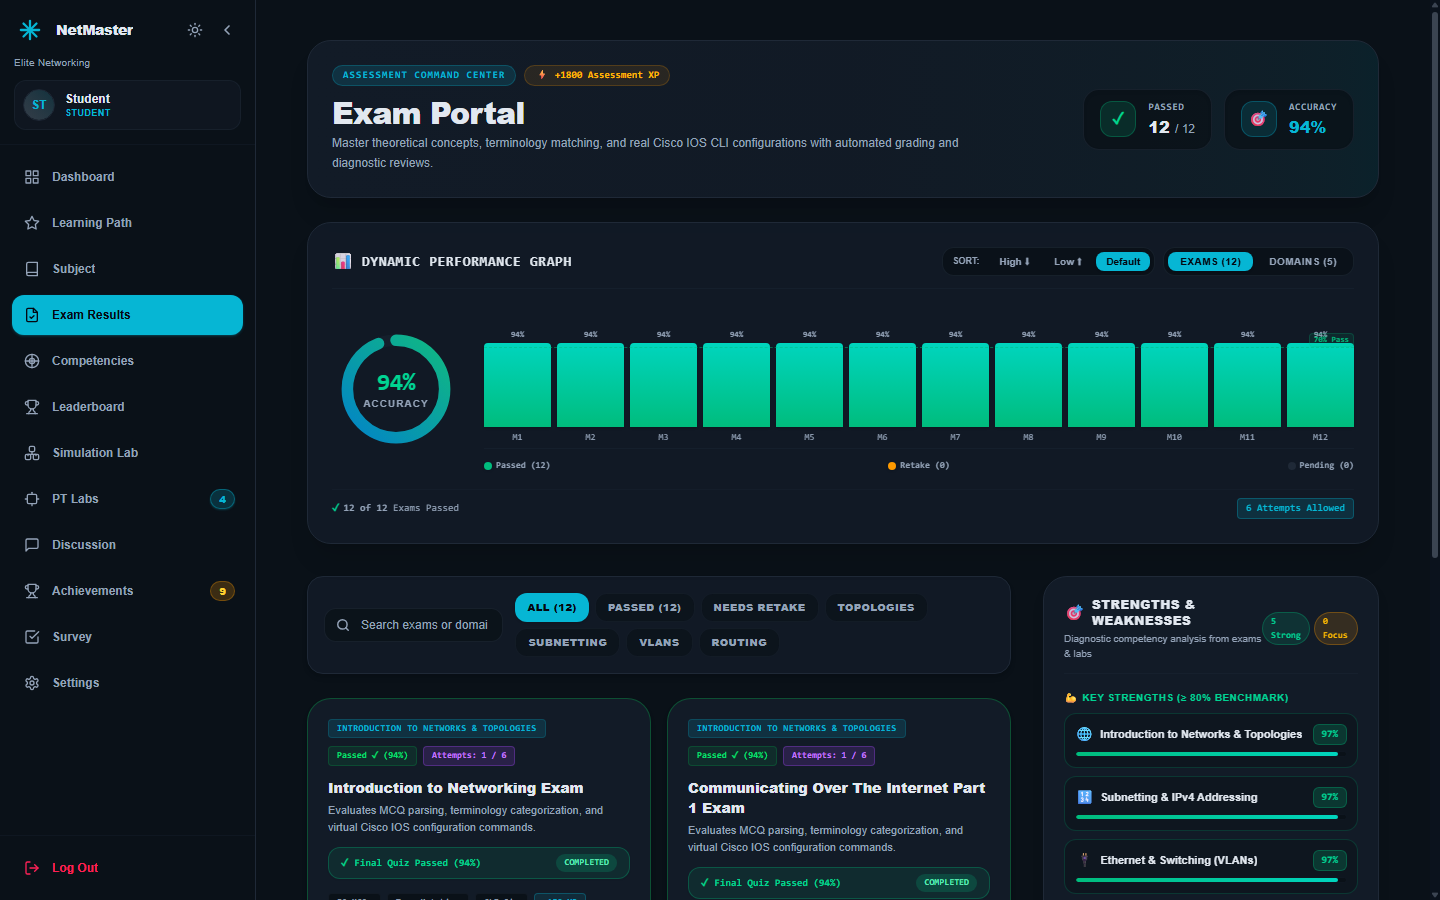
Review Exam Results & Take Comprehensive Final Quiz

Monitor all 12 module exams, inspect competency domain breakdowns, review submitted answers, and complete the 3-Part Comprehensive Final Quiz.

Before You Start (Prerequisites)
  • •Completed Module Lessons & Interactive Activities
Exact Step-by-Step Instructions
1.

Click 'Exam Results' in the Sidebar

Open /student/quizzes to check your Passed counter (e.g., 12/12), overall Accuracy percentage gauge, and M1-M12 Dynamic Performance Graph.

2.

Filter by Module, Status or Competency Domains

Switch between 'EXAMS (12)' and 'DOMAINS (5)', filter by 'PASSED' / 'NEEDS RETAKE' / topic tags, and check Strengths & Weaknesses.

⚠️
Avoid This Common MistakeExiting fullscreen or Alt-Tabbing during an exam triggers anti-cheat alerts and consumes an attempt.
netmaster.edu/student/quizzes
Student View
Exam Portal displaying Accuracy Gauge, M1-M12 Graph & Assessments (/student/quizzes)
Click to Enlarge Full Screenshot

📷 Exam Portal displaying Accuracy Gauge, M1-M12 Graph & Assessments (/student/quizzes)

STEP 09Hands-On Practice⏱ 15 mins

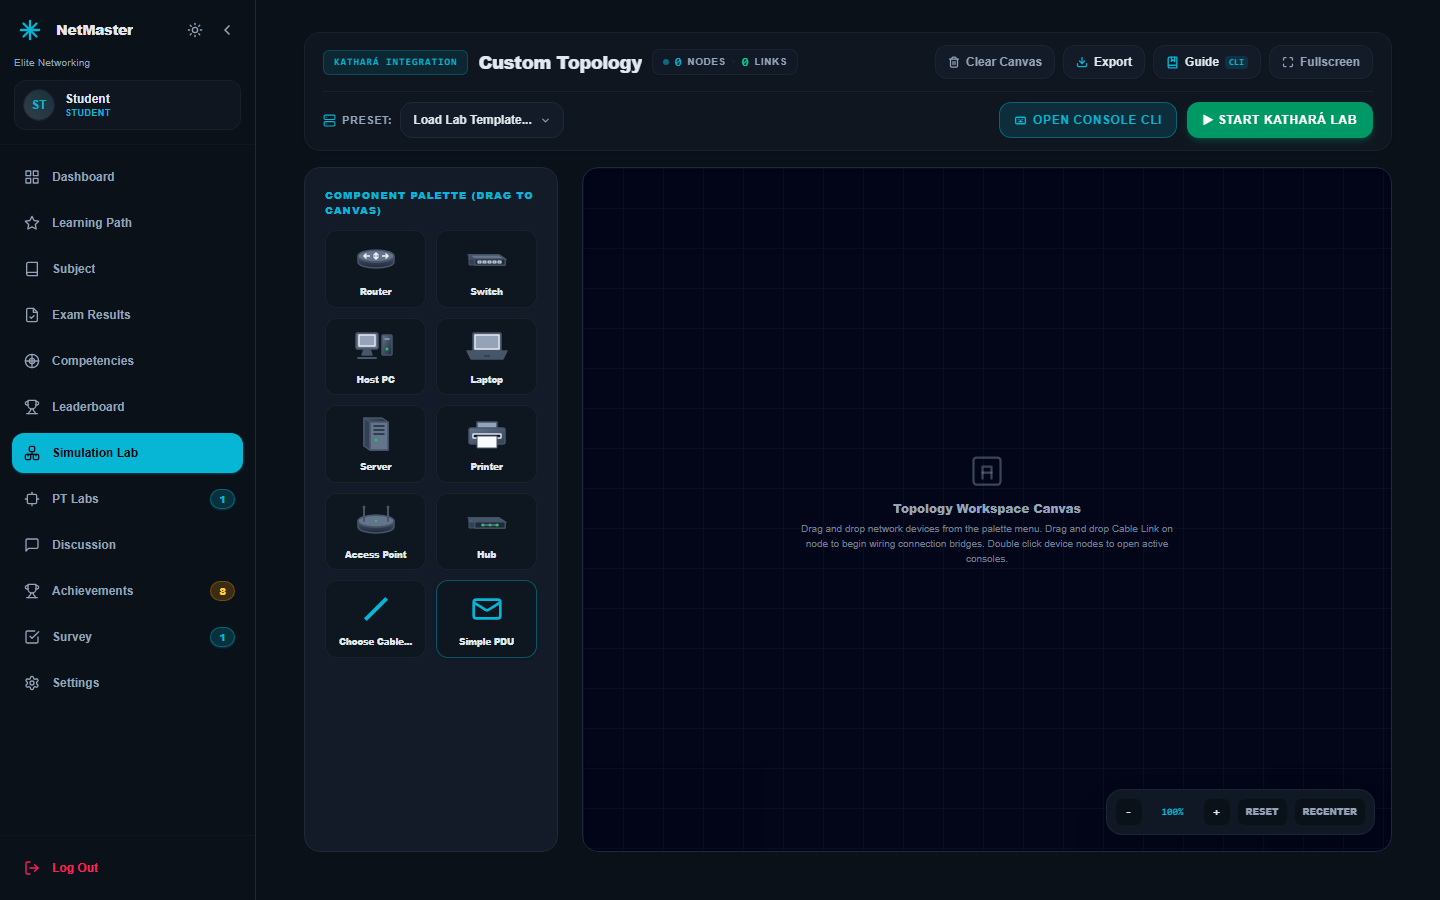
Build Topologies & Practice CLI in Simulation Lab

Design custom topologies or load preset templates in the Simulation Lab, configure virtual routers and switches via Cisco IOS CLI, and test connectivity directly in the browser.

Before You Start (Prerequisites)
  • •Logged in as Student
Exact Step-by-Step Instructions
1.

Open 'Simulation Lab' in the Sidebar

Click 'Simulation Lab' (/student/simulation) to load the Component Palette (Router, Switch, Host PC, Laptop, Server) and Topology Workspace Canvas.

2.

Drag Devices or Pick 'Load Lab Template...'

Drag Router/Switch nodes onto the grid canvas and connect links, or select a ready-made scenario from the 'Load Lab Template...' dropdown.

⚠️
Avoid This Common MistakeForgetting `no shutdown` leaves configured router GigabitEthernet interfaces administratively down.
netmaster.edu/student/simulation
Student View
Simulation Lab Canvas with Component Palette, Open Console CLI & Kathara Lab (/student/simulation)
Click to Enlarge Full Screenshot

📷 Simulation Lab Canvas with Component Palette, Open Console CLI & Kathara Lab (/student/simulation)

STEP 10Hands-On Practice⏱ 30-45 mins per lab

Download, Build & Submit Cisco Packet Tracer Labs

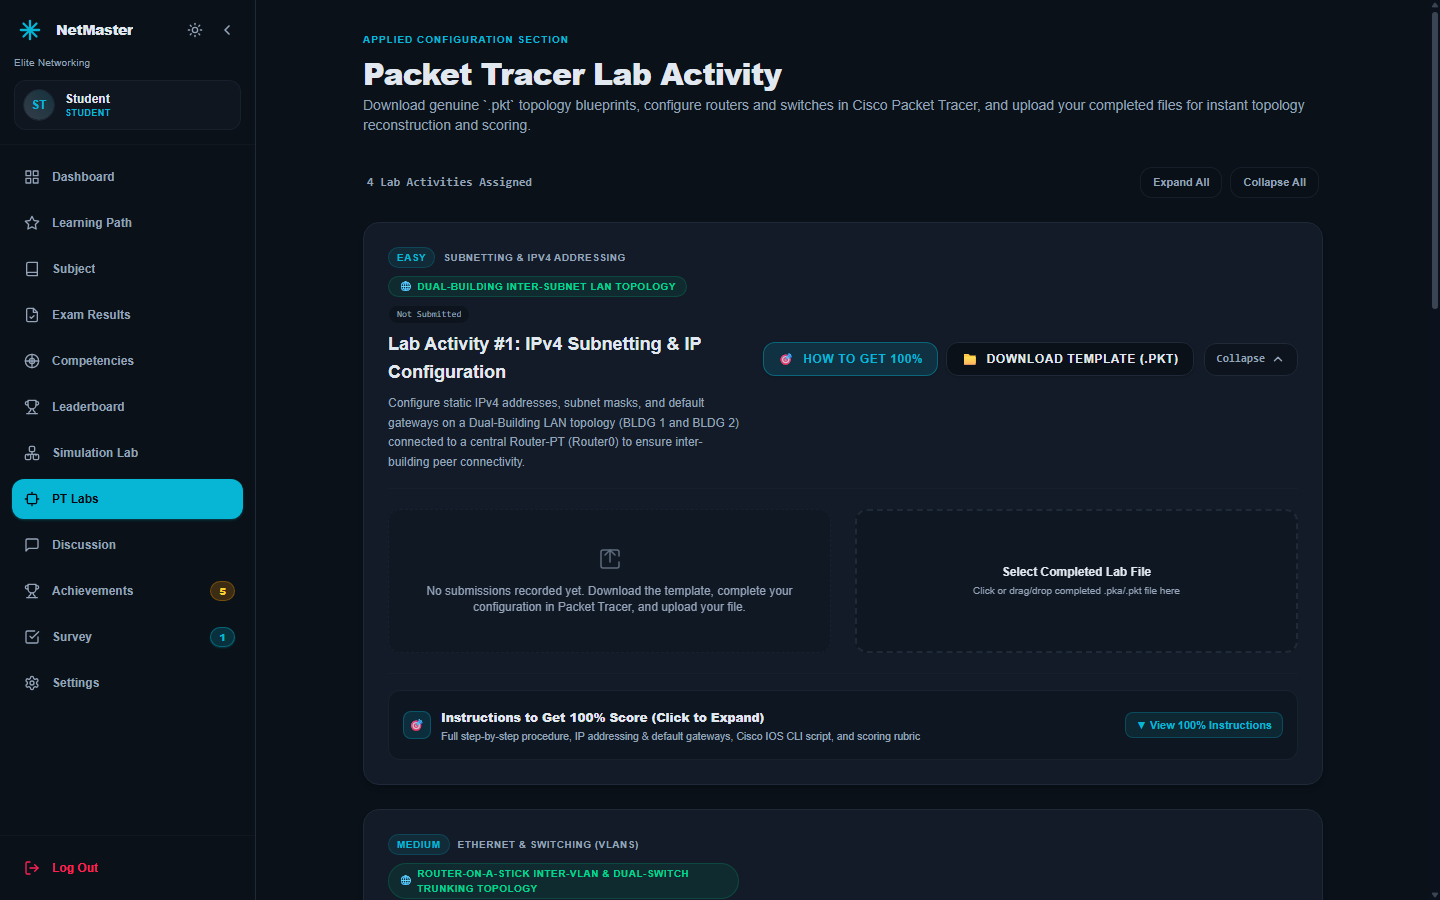
Complete all 4 official Packet Tracer Lab Activities (IPv4 Subnetting, VLAN Trunking, Basic Static Routing, Route Redundancy) for hands-on grading.

Before You Start (Prerequisites)
  • •Cisco Packet Tracer installed on your computer
Exact Step-by-Step Instructions
1.

Open 'PT Labs' in the Sidebar

Click 'PT Labs' (/student/labs) to view all 4 assigned Packet Tracer lab activities. Use 'Expand All' at top right to reveal every card.

2.

Click 'DOWNLOAD TEMPLATE (.PKT)'

Click the gold 'DOWNLOAD TEMPLATE (.PKT)' button on the lab card to save the official starter topology file to your device.

⚠️
Avoid This Common MistakeUploading the unmodified starter template instead of saving your completed configuration file first.
netmaster.edu/student/labs
Student View
Packet Tracer Lab Activity showing Download Template (.pkt), Upload & Instructions (/student/labs)
Click to Enlarge Full Screenshot

📷 Packet Tracer Lab Activity showing Download Template (.pkt), Upload & Instructions (/student/labs)

STEP 11Analytics & Community⏱ 2 mins

Analyze Your Networking Competencies & Mastery

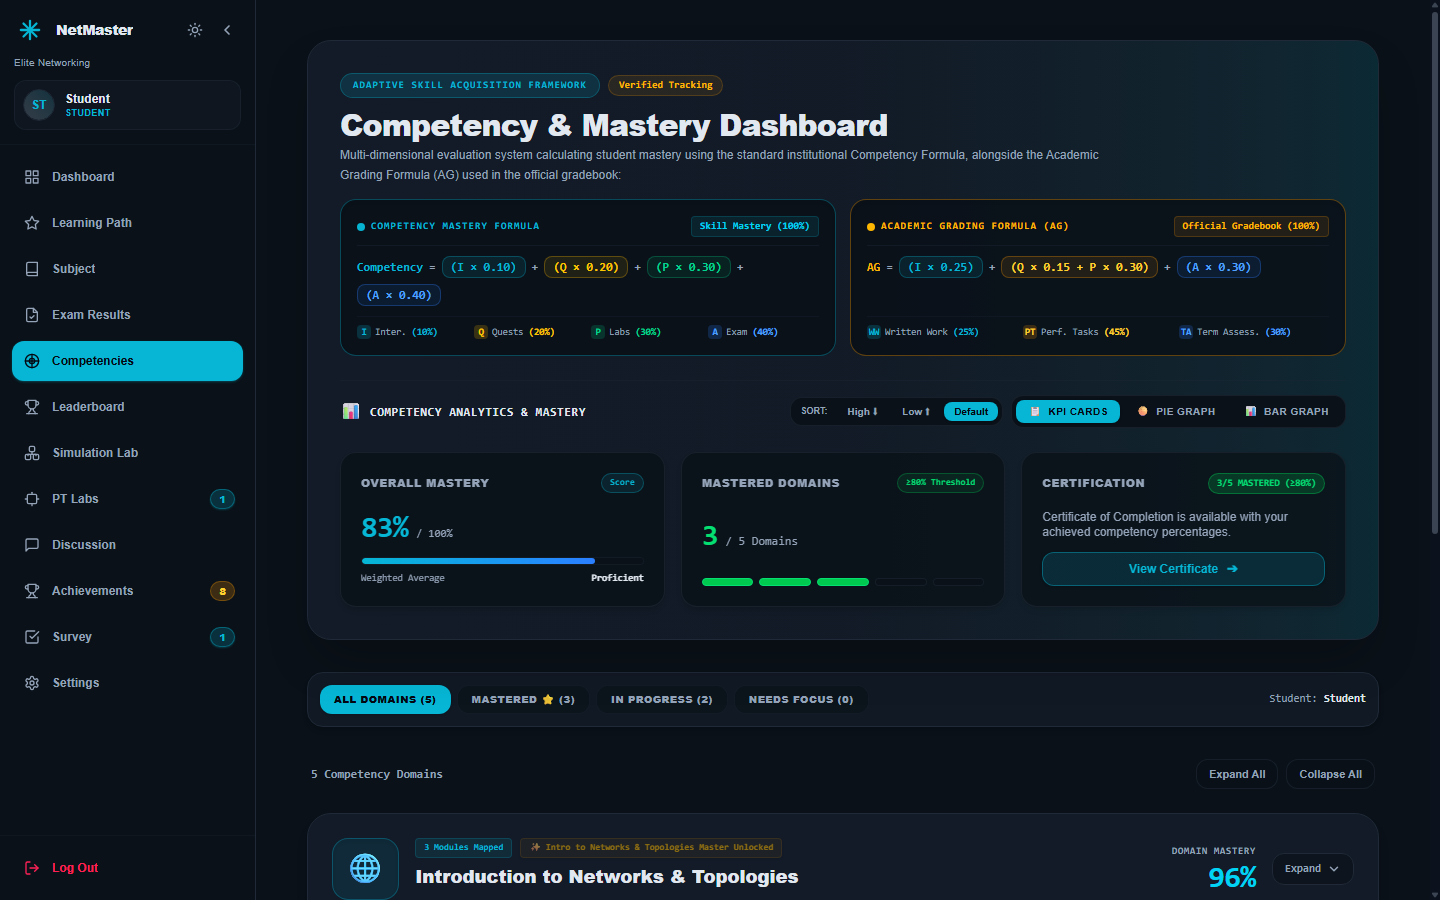
Track your weighted competency score across all 5 Cisco Networking pillars combining Interactive Activities (10%), Quests (20%), PT Labs (30%), and Exams (40%).

Before You Start (Prerequisites)
  • •Completed at least 1 graded activity, lab, or exam
Exact Step-by-Step Instructions
1.

Open 'Competencies' in the Sidebar

Click 'Competencies' (/student/competencies) to view Overall Mastery percentage and how many of the 5 core domains meet the >=80% threshold.

2.

Inspect Competency Analytics & Filter Tabs

Toggle KPI Cards / Pie Graph / Bar Graph or filter domains by 'MASTERED', 'IN PROGRESS', or 'NEEDS FOCUS'.

⚠️
Avoid This Common MistakeFocusing only on multiple-choice quizzes while neglecting Packet Tracer labs (which carry 30% of competency mastery weight).
netmaster.edu/student/competencies
Student View
Competency & Mastery Dashboard showing 80% Benchmark & Domains (/student/competencies)
Click to Enlarge Full Screenshot

📷 Competency & Mastery Dashboard showing 80% Benchmark & Domains (/student/competencies)

STEP 12Analytics & Community⏱ 1 min

Check Your Rank on the Class Leaderboard

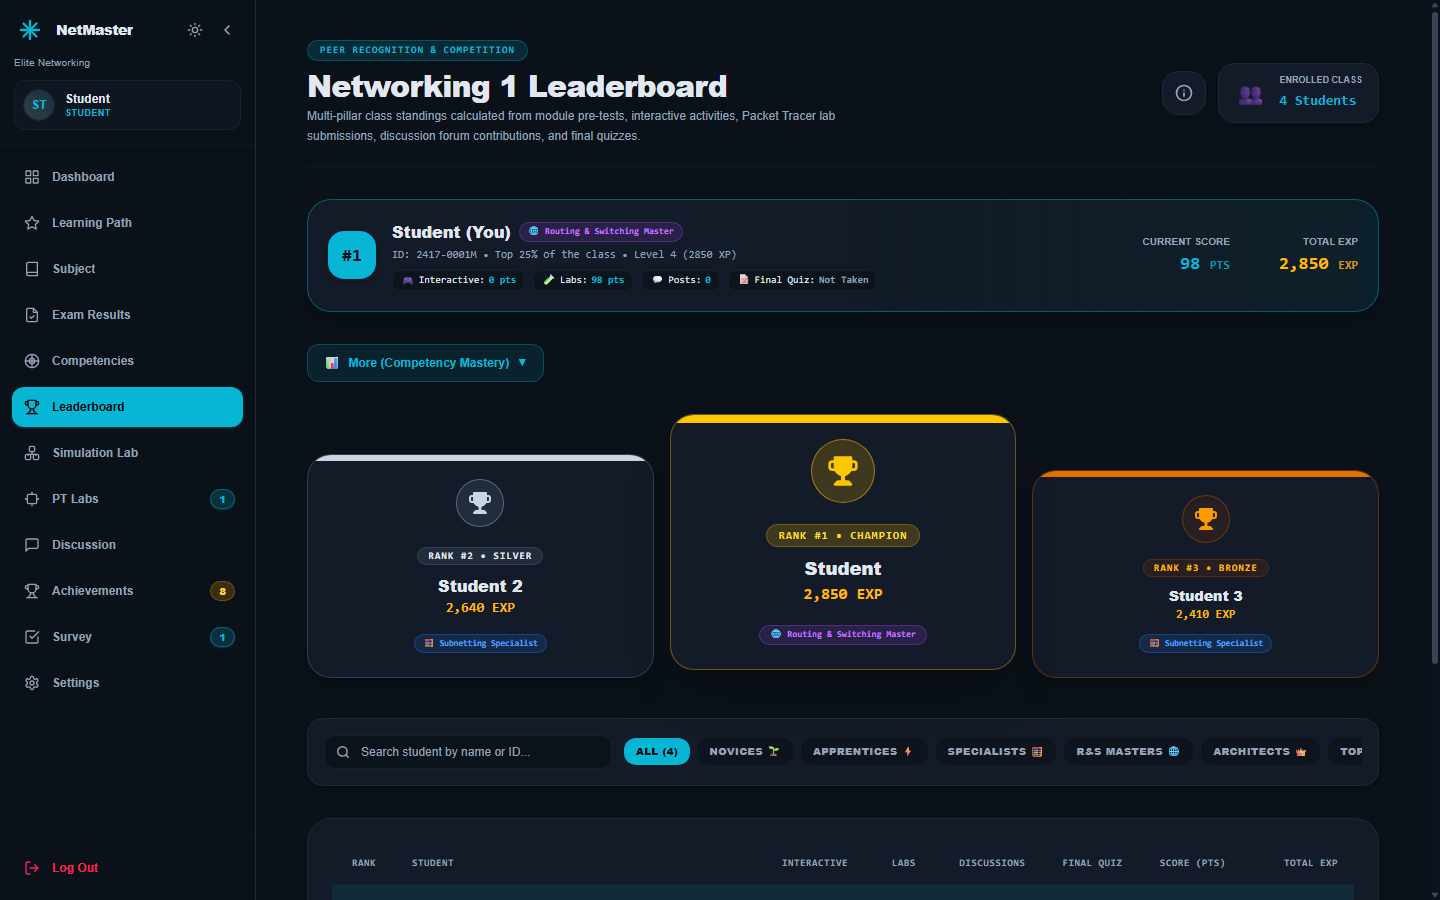
Compare your rank, competency points, and total EXP against classmates in real time on the Class Leaderboard.

Before You Start (Prerequisites)
  • •Admitted Student Account
Exact Step-by-Step Instructions
1.

Open 'Leaderboard' in the Sidebar

Click 'Leaderboard' (/student/leaderboard) to view the class standings calculated from labs, interactive activities, discussions, and exams.

2.

Check Your 'Student (You)' Highlight Card & Top 3 Podium

Inspect the highlighted banner showing your current Rank (#1), Level, Total EXP, and pillar breakdown above the Top 3 Podium cards.

⚠️
Avoid This Common MistakeNone — earn EXP fairly through completed coursework, daily claims, quests, labs, and constructive discussion replies.
netmaster.edu/student/leaderboard
Student View
Networking 1 Leaderboard displaying Student Podium & Standings (/student/leaderboard)
Click to Enlarge Full Screenshot

📷 Networking 1 Leaderboard displaying Student Podium & Standings (/student/leaderboard)

STEP 13Analytics & Community⏱ 5 mins

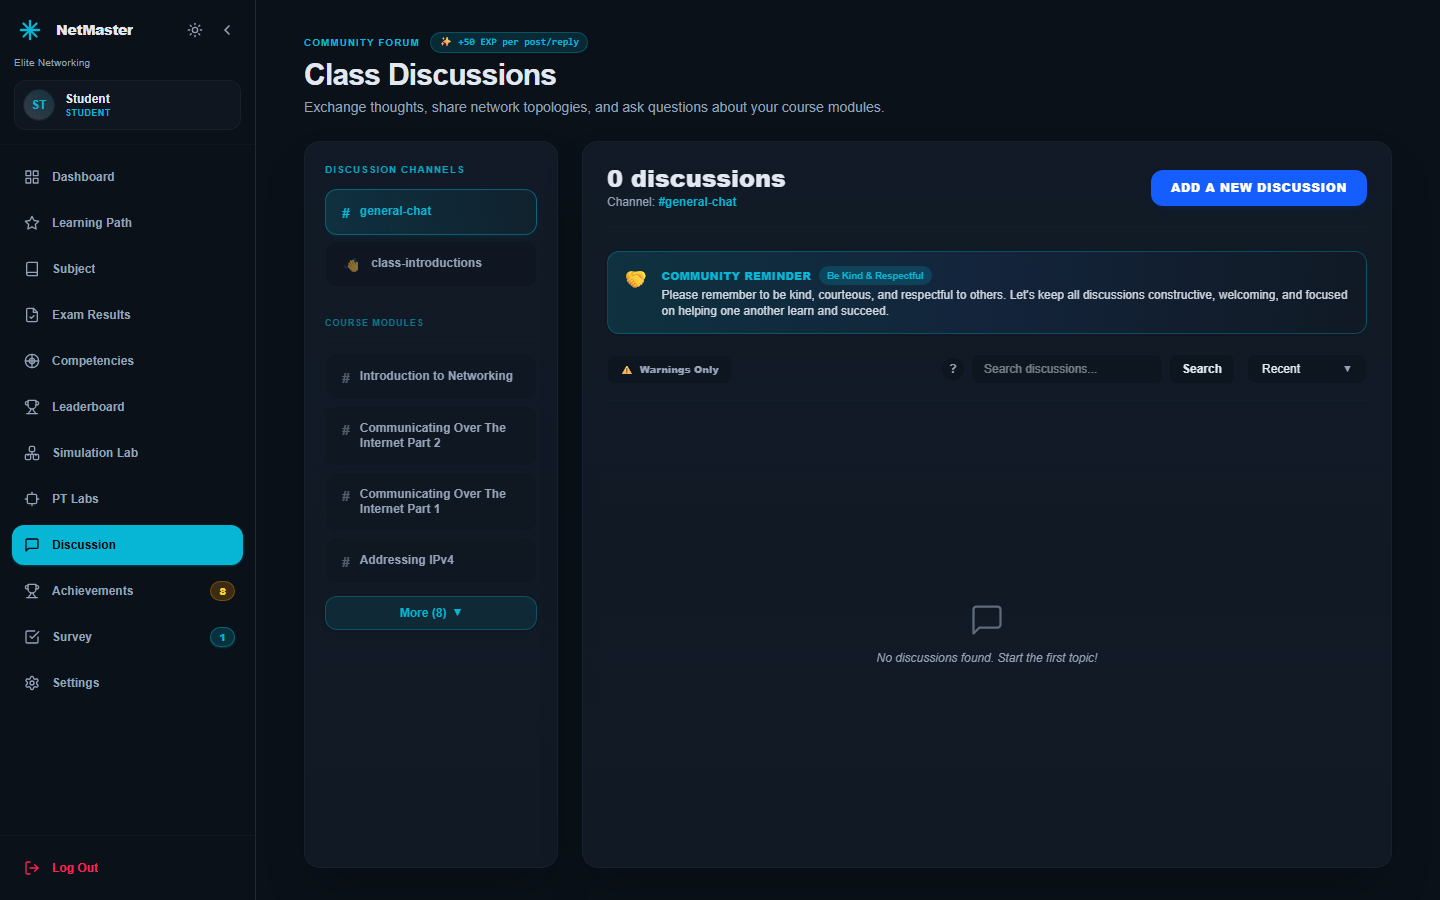
Ask Questions & Collaborate on Class Discussions

Use Class Discussions to ask module questions, share troubleshooting tips with classmates, earn +50 EXP per post or reply, and spot Professor-Verified answers.

Before You Start (Prerequisites)
  • •Logged in as Student
Exact Step-by-Step Instructions
1.

Open 'Discussion' in the Sidebar

Click 'Discussion' (/student/discussion) to access channels such as '# general-chat', 'class-introductions', and Course Modules.

2.

Select a Channel or Course Module Thread

Pick the channel matching your question (e.g., Introduction to Networking or Addressing IPv4) or search existing topics.

⚠️
Avoid This Common MistakePosting vague questions without naming the module, device interface, or exact Cisco error message.
netmaster.edu/student/discussion
Student View
Class Discussions Forum displaying Channels & Add Discussion (+50 EXP) (/student/discussion)
Click to Enlarge Full Screenshot

📷 Class Discussions Forum displaying Channels & Add Discussion (+50 EXP) (/student/discussion)

STEP 14Survey⏱ 3 mins

Complete the Mandatory ISO/IEC 25010 Evaluation Survey

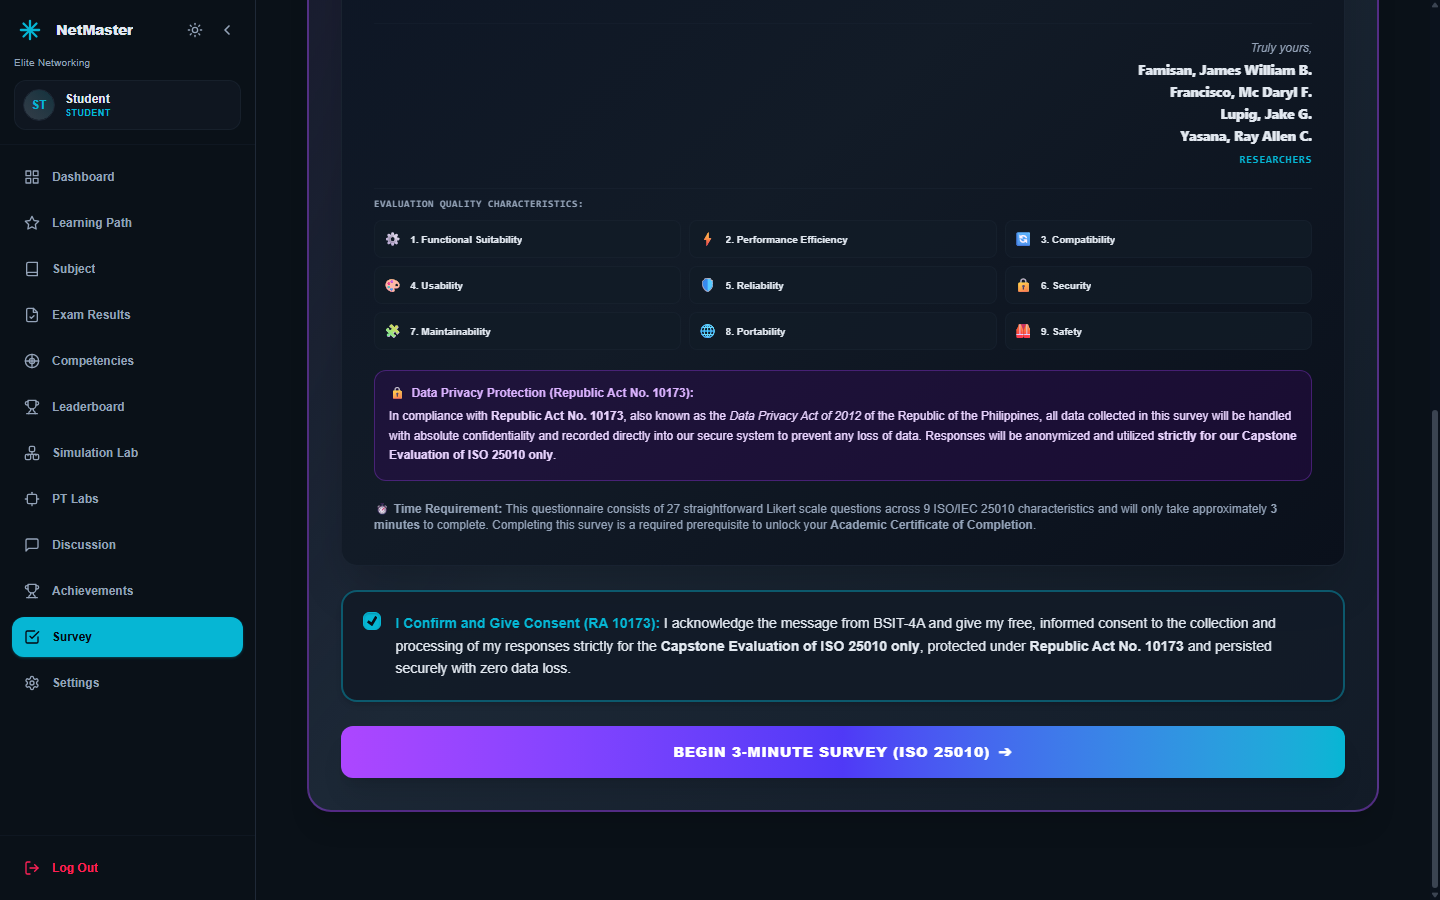
Complete the 27-item ISO/IEC 25010 Software Quality Evaluation Survey across 9 quality characteristics as a required step toward your completion records.

Before You Start (Prerequisites)
  • •Logged in as Student
Exact Step-by-Step Instructions
1.

Click 'Survey' in the Left Sidebar

Open /student/survey and read the BSIT-4A Data Privacy Protection letter (Republic Act No. 10173).

2.

Check Consent & Click 'BEGIN 3-MINUTE SURVEY (ISO 25010) ->'

Check the 'I Confirm and Give Consent (RA 10173)' box at the bottom of the notice and click 'BEGIN 3-MINUTE SURVEY (ISO 25010) ->' to open the 27 items.

⚠️
Avoid This Common MistakeLeaving even 1 out of 27 Likert items unanswered or forgetting to check the Consent box before starting.
netmaster.edu/student/survey
Student View
ISO/IEC 25010 Survey Consent & Likert Scale Questionnaire (/student/survey)
Click to Enlarge Full Screenshot

📷 ISO/IEC 25010 Survey Consent & Likert Scale Questionnaire (/student/survey)

STEP 15Certification⏱ 2 mins

Unlock Digital Badges & Mastery Achievements

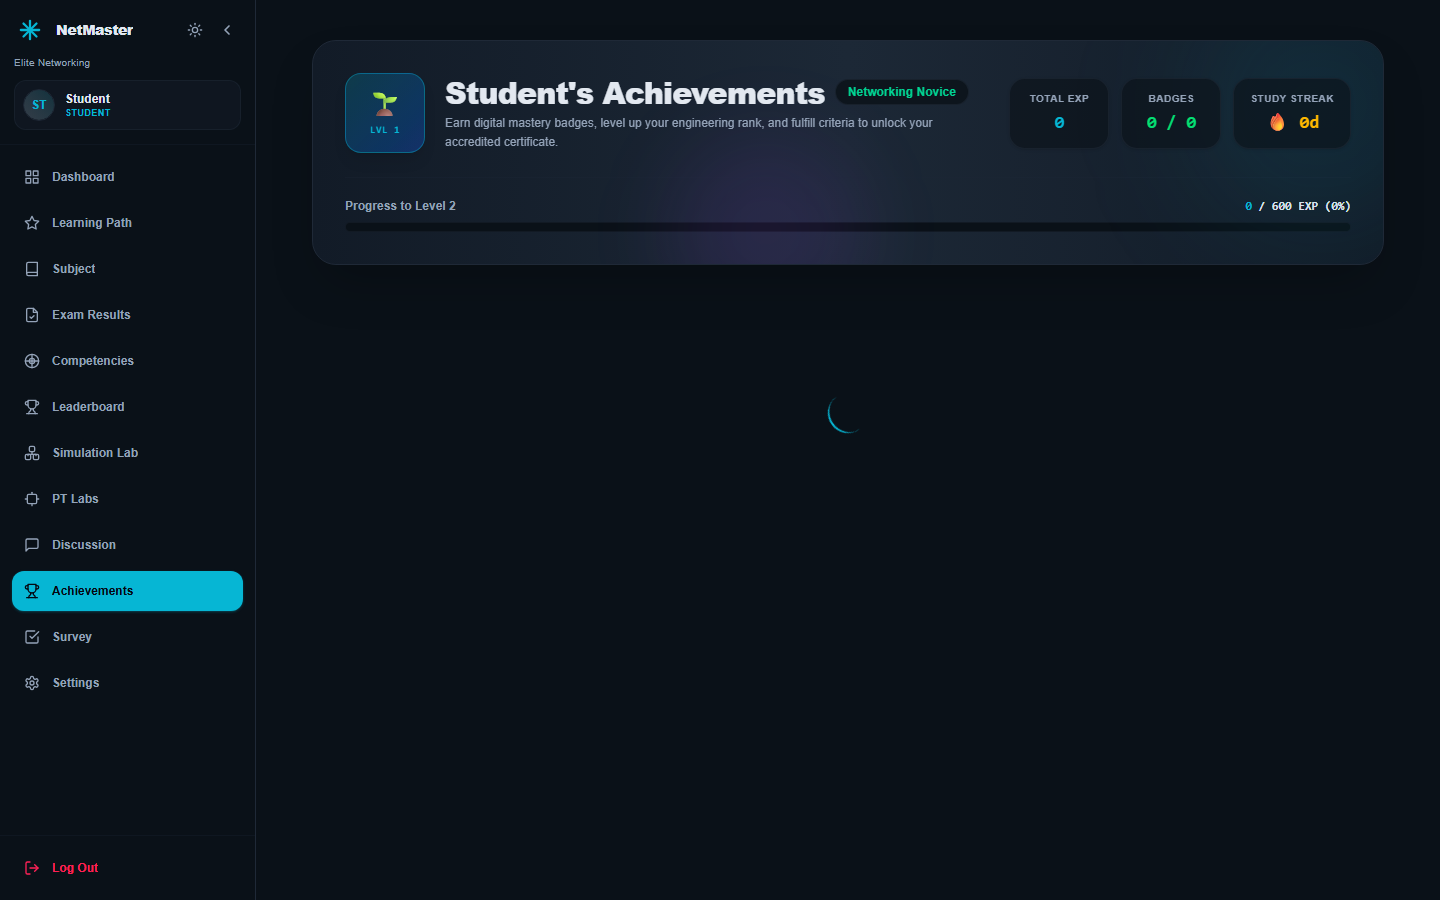
Review all earned digital mastery badges, inspect locked badge progress bars, and check your official Certificate eligibility status.

Before You Start (Prerequisites)
  • •Active Student progress across modules, streaks, and labs
Exact Step-by-Step Instructions
1.

Open 'Achievements' in the Sidebar

Click 'Achievements' (/student/achievements) to inspect your rank banner, Badges count (e.g., 9/9), and Collection Mastery percentage ring.

2.

Filter & Claim Earned Digital Badges

Switch between 'All', 'Earned', 'Locked', 'Skills', and 'Honor Roll' tabs, click any unlocked badge to inspect its award date, and claim bonus EXP rewards when prompted.

⚠️
Avoid This Common MistakeLeaving an Interactive Activity or a PT Lab unsubmitted will keep your Achievement badge set and Certificate banner locked.
netmaster.edu/student/achievements
Student View
Student Achievements Badge Gallery & Collection Mastery Ring (/student/achievements)
Click to Enlarge Full Screenshot

📷 Student Achievements Badge Gallery & Collection Mastery Ring (/student/achievements)

STEP 16Certification⏱ 2 mins

Receive, Export & Verify Your Official Certification

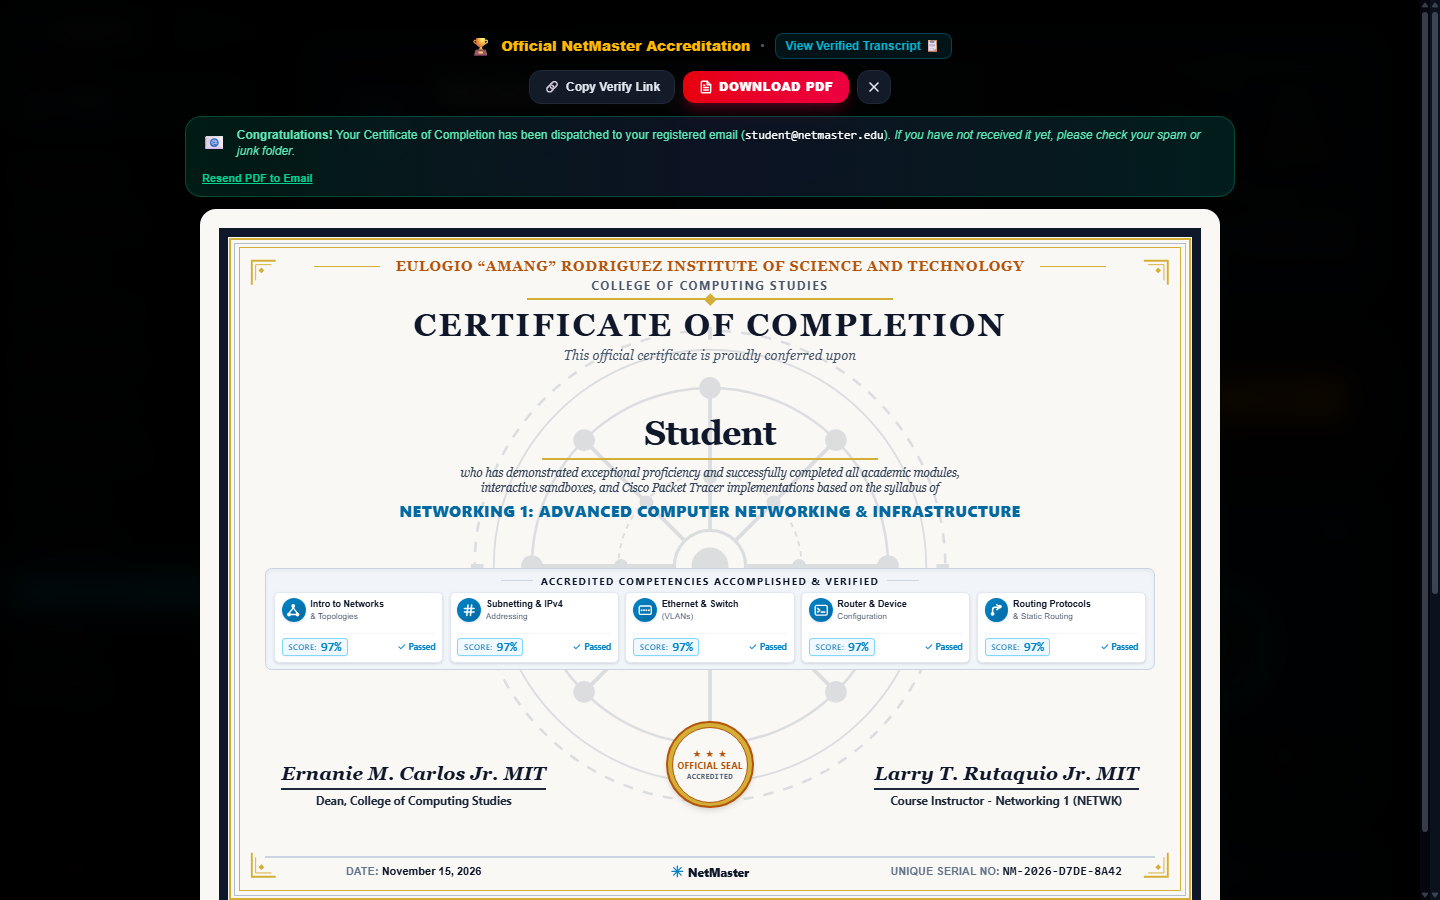
Once all course modules, pre-tests, interactive activities, all 4 Packet Tracer labs, exams, and the ISO 25010 survey are completed, receive your official NetMaster Certificate of Completion issued to Student.

Before You Start (Prerequisites)
  • •All 12 Modules, Pre-Tests, and Interactive Activities completed
  • •All 4 Packet Tracer Labs submitted
  • •All Module Quizzes & ISO/IEC 25010 Survey completed
Exact Step-by-Step Instructions
1.

Click 'VIEW & EXPORT CERTIFICATE' on Achievements

On /student/achievements (or directly from the Dashboard certificate banner), click the amber 'VIEW & EXPORT CERTIFICATE' button to generate and open your accredited certificate.

2.

Review Your Signed Official Certificate & Competencies

Verify your recipient name ('Student'), accredited Networking 1 title, all 5 Competency scores, Dean & Instructor signatures, Official Seal, and Unique Serial No (e.g., NM-2026-D7DE-8A42). Your certificate copy is also dispatched automatically to your registered email.

⚠️
Avoid This Common MistakeForgetting to download or email a copy before logging out, or sharing an incomplete screenshot instead of the official DOWNLOAD PDF / verification link.
netmaster.edu/student/achievements
Student View
Official NetMaster Certificate of Completion issued to 'Student' with PDF Export & Serial ID
Click to Enlarge Full Screenshot

📷 Official NetMaster Certificate of Completion issued to 'Student' with PDF Export & Serial ID

STEP 17Account Settings⏱ 2 mins

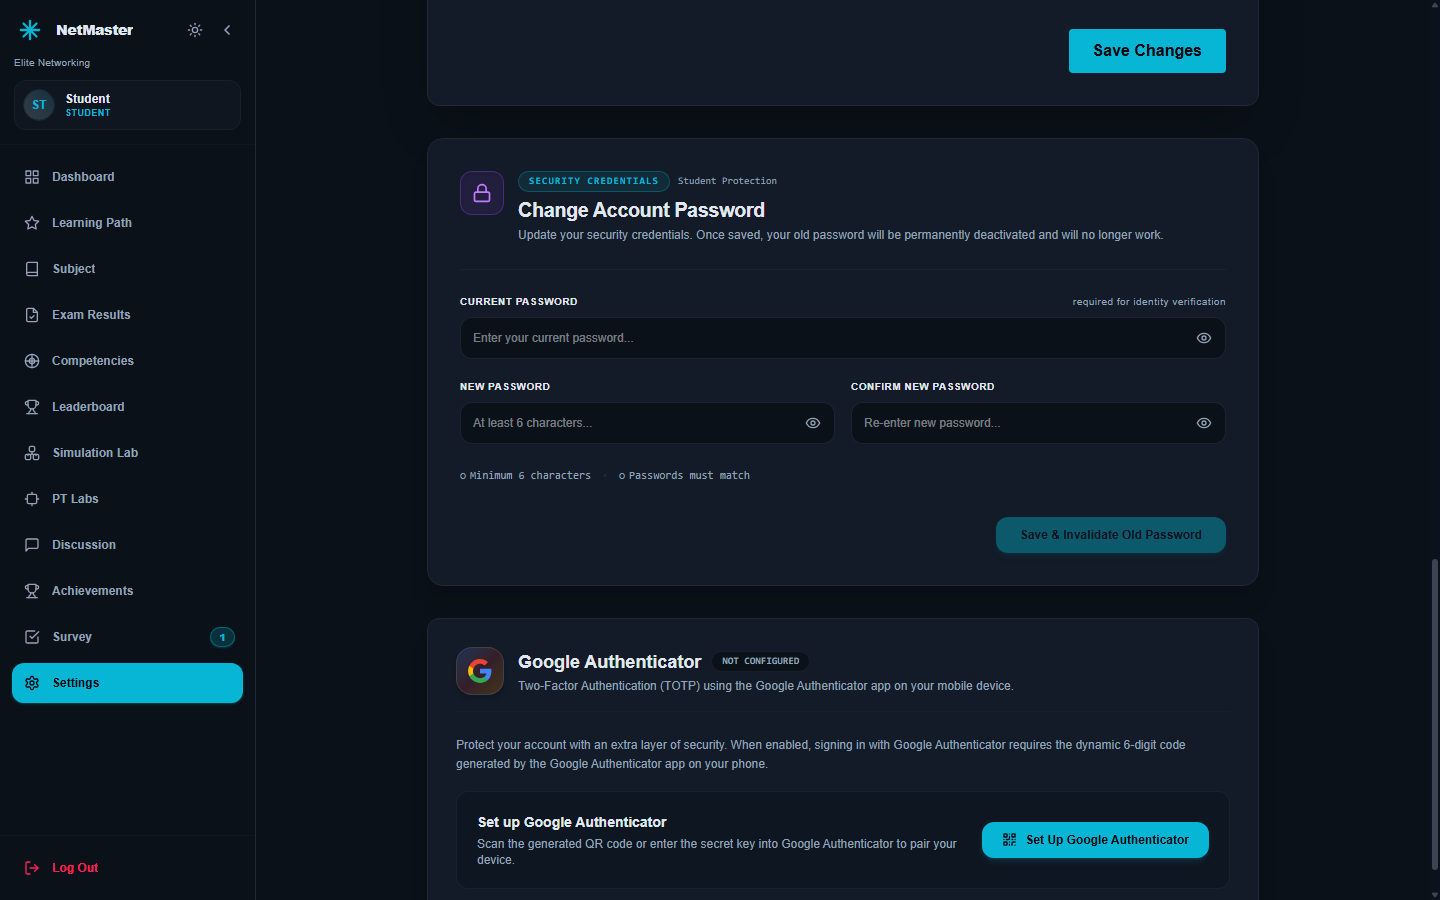
Customize Profile, Theme & Two-Factor Security

Personalize your student avatar and profile, update your password safely, activate Google Authenticator (2FA), and switch Dark Mode or Light Mode anytime.

Before You Start (Prerequisites)
  • •Logged in as Student
Exact Step-by-Step Instructions
1.

Open 'Settings' in the Sidebar

Click 'Settings' (/student/settings) at the bottom of the left sidebar menu.

2.

Choose an Avatar or Update Profile Fields

Select one of the 10 Student Cartoon Avatars or upload a custom photo, click 'Save Profile Picture Only' / 'Save Changes', and verify personal profile details.

⚠️
Avoid This Common MistakeClosing the Google Authenticator dialog before verifying the 6-digit TOTP code leaves 2FA unactivated.
netmaster.edu/student/settings
Student View
Student Settings: Avatar, Password Update & Google Authenticator 2FA (/student/settings)
Click to Enlarge Full Screenshot

📷 Student Settings: Avatar, Password Update & Google Authenticator 2FA (/student/settings)

Ready to Start Learning?

Begin Your NetMaster Student Journey Today

Follow Step 1 to register your official Student account, or sign in directly if your professor has already admitted your profile.